Showing posts with label view B. Show all posts
Showing posts with label view B. Show all posts
Monday, January 6, 2014
Saturday, December 7, 2013
View B Part 3
At this point you should have the exterior layer constructed and set aside, as well as the interior layer constructed and whip stitched to the buckram form.
Attach Exterior Layer to Buckram Form
Fold seam allowances to wrong side, match centers and pin Exterior layer to the buckram form.
Once the Exterior layeris pinned to the buckram form, use a slip stitch to hand sew it to the buckram form.
The concludes the tutorial for View 3.
You may notice that I'm not including trimming the bonnet, this is because I'm not looking for exact duplicates. I trust you to trim your bonnet however you see fit. Just for your reference, the View B's example that I made is trimmed with a large embroidered net lace collar that I ordered from China on Ebay. It was $10. I guess what I'm saying is, find pretty things for your bonnet and trim away.
You may notice that I'm not including trimming the bonnet, this is because I'm not looking for exact duplicates. I trust you to trim your bonnet however you see fit. Just for your reference, the View B's example that I made is trimmed with a large embroidered net lace collar that I ordered from China on Ebay. It was $10. I guess what I'm saying is, find pretty things for your bonnet and trim away.
Friday, December 6, 2013
View B Part 2
Cutting for Interior Layer
Cut one Shirring Panel on Fold. Remember when I talked about Turn of Cloth? This is where that comes into play. I have given you 1/2 of an inch for seam allowance. This is most likely enough. It was for my silk taffeta. But maybe your covering your bonnet in Velvet or something else thick... 1/2 an inch wont be enough. I added 1/4 of an inch to the oustide seam allowance. Truth be told I ended up cutting it away, but better safe than sorry. It's quite a lot of work to go through to make this shirring panel. You wouldn't want to hve to make it again just because it was 1/4" of an inch too short.
Interior Construction
With your favorite marking method, mark all shirring channels. (I mark a straight line in the center) Fold between each shirring channel.
Creating Shirring Channels
You are going to need some cord, or heavy string. You could use button hole twist, or embroidery thread. I'm using crochet cotton by DMC.
Sew a scant 1/8 of an inch from the folds edge. Be careful not to catch the crochet cotton in your stitches.
Once all your channels are finished use a wide eyed needle and tie knots on one side of the shirring panels shirring chords.
Now on both sides of the shirring pannels seam allowances (outside edge, and crown/seam allowance) Sew 2 rows of gathering stitches, inside the seam allowances.
Now on the Brim/Crown side, pull up gathering stitches. Match center with Crowns center. Sew Brim/Crown seam.
Ok, just to be clear, you are sewing from one edge to the other, don't leave off the seam allowances on the outside edges of the X's.
Also, you can use either side of the shirring pannel as the right side. I am using the inside folded edge as my right side.
Now pin the interior cover to the buckram form, matching centers. Remember that there will be 1/2 of an inch seam allowances on all sides. Draw up shirring chords to fit the buckram form.
Work your way from the Brim/Crown seam, drawing up on cord at a time. The very last will be the 2 lines of gathering stitches that are in the outside edge seam allowance.
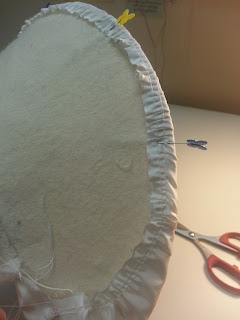
Once everything is gathered up pin the outside edge to the form rolling the seam allowance over the buckrams outside edge.
Now use a whip stitch and sew the interior layers seam allowance to the external mull.
Whatever left over seam allowance you can trim away. Especially at the round Brim corners. When you do trim away, make sure you don't clip the shirring channel cords.
View B part 1
View B
A simple exterior,A Shirred interior,
A ruffle along the outside edge
Cutting for Exterior:
Cut 1 simple brim on Bias with 1/2 inch seam allowance includedCut 1 Crown on Bias with 1/2 inch seam allowance included
Exterior Application:
Mark X's and Centers on both brim and crown. Sew between X's in Brim/Crown seam. DO NOT sew to fabrics edge.
Notch seam allowances between X's and trim.
With a water soluable pen mark X's on right side of fabric.
Using a 1/2" seam allowance apply ruffle or lace to the entire oustide edge of Brim and Crown. When you get to X's in Brim and Crown seam, sink your needle into X and pivot, making sure not to catch seam allowances.
Using a 1/2" seam allowance apply ruffle or lace to the entire oustide edge of Brim and Crown. When you get to X's in Brim and Crown seam, sink your needle into X and pivot, making sure not to catch seam allowances.
When completed with Exertior cover, set asside.
Tuesday, December 3, 2013
Turn of Cloth and Millinery
Most good millinery patterns that you can buy, don't include seam allowances. The reason for this is simply summed up in the concept of "Turn of Cloth".
The idea of "Turn of Cloth" is based on the premise that fabric itself has demension, and to create items that are constructed of different layers of fabric, the layers on the exterior will be larger than the layers on the interior. Most of the time when using "Turn of Cloth" a small amount of fabric will be cut away from the garments lining, to make the finished seam lay without any bubbles or unsightly bumps. This technique is used on collars especially. "Turn of Cloth" is also known as seam rolling, or pin rolling. Corset makers use this technique often by placing the fabic over their knee while pinning, so that the lining layer is shorter than the fashion layer.
You can also think of "Turn of Cloth" as the layers of an onion. The interior layers are smaller than the outside layers. Or as those cute Russian stacking dolls. The outside doll needs to be large enough to fit all of the tiny dolls inside.
Unfortunately, the shirring pannel is cut on the grain, and will not be stretchy to pull over the outside edge. So as the pattern develper, I have given you 1/2 of an inch to compensate for turn of cloth. Depending on your fabrics thickness however this may be too much, or it may not be enough. I can't know, because all fabrics are different. My best advice is to cut extra for yourself. You will be able to remove it if it's too much.
So you can see why most millinery patterns don't include seam allowances, they avoid the headache of "turn of cloth" entirely. I've decided to educate instead, and give you a pattern that falls in the middle of the road. I think it best to trust in the users ability instead of pretending like you won't understand the concept of "Turn of Cloth". And anyway, it's not my fault, blame geometry. :) Jerky Math, always getting in the way of my creativity.
The idea of "Turn of Cloth" is based on the premise that fabric itself has demension, and to create items that are constructed of different layers of fabric, the layers on the exterior will be larger than the layers on the interior. Most of the time when using "Turn of Cloth" a small amount of fabric will be cut away from the garments lining, to make the finished seam lay without any bubbles or unsightly bumps. This technique is used on collars especially. "Turn of Cloth" is also known as seam rolling, or pin rolling. Corset makers use this technique often by placing the fabic over their knee while pinning, so that the lining layer is shorter than the fashion layer.
You can also think of "Turn of Cloth" as the layers of an onion. The interior layers are smaller than the outside layers. Or as those cute Russian stacking dolls. The outside doll needs to be large enough to fit all of the tiny dolls inside.
Unfortunately for millinery makers, we are not working from the outside in. We are starting with the most inward layer, the buckram form. The more layers we add to the buckram the larger our fabric pieces need to be. This is why most millinery patterns don't include seam allowance. It's very simple to remove extra fabric, but imposible to add fabric once it's been cut away.
For view A this wasn't a problem. All of the pattern pieces are cut on the bias and are stretchy. Also the oustide edge is covered with bias tape. And if you remember I asked you to cut the bias tape a small amount wider. This is to account for "turn of cloth".
Unfortunately, the shirring pannel is cut on the grain, and will not be stretchy to pull over the outside edge. So as the pattern develper, I have given you 1/2 of an inch to compensate for turn of cloth. Depending on your fabrics thickness however this may be too much, or it may not be enough. I can't know, because all fabrics are different. My best advice is to cut extra for yourself. You will be able to remove it if it's too much.
So you can see why most millinery patterns don't include seam allowances, they avoid the headache of "turn of cloth" entirely. I've decided to educate instead, and give you a pattern that falls in the middle of the road. I think it best to trust in the users ability instead of pretending like you won't understand the concept of "Turn of Cloth". And anyway, it's not my fault, blame geometry. :) Jerky Math, always getting in the way of my creativity.
Subscribe to:
Posts (Atom)


